
Jul
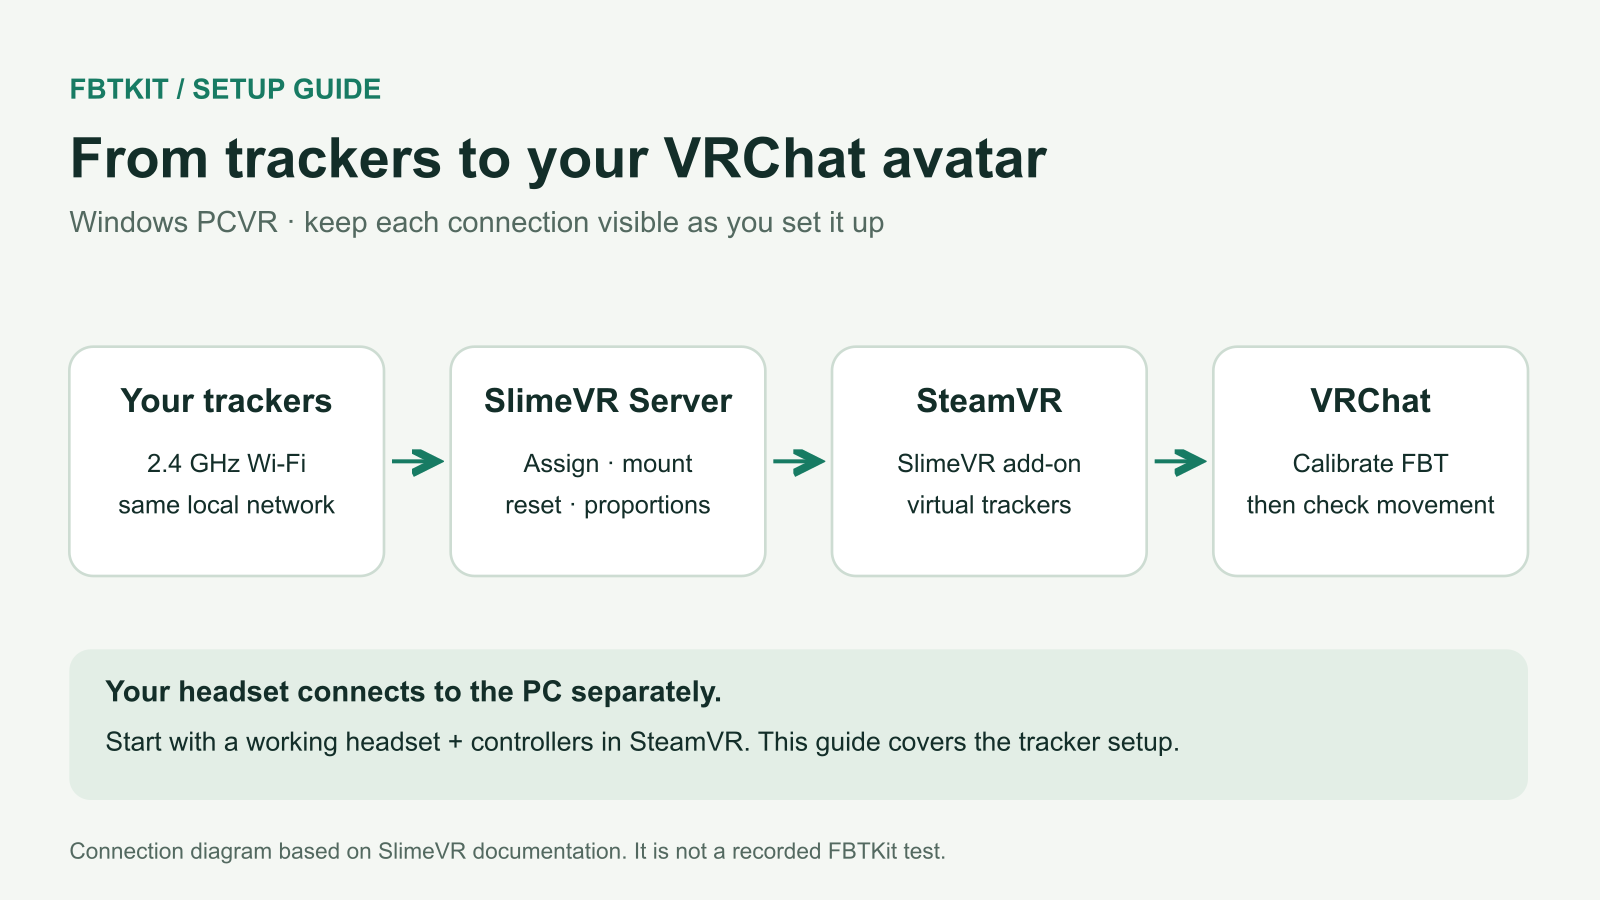
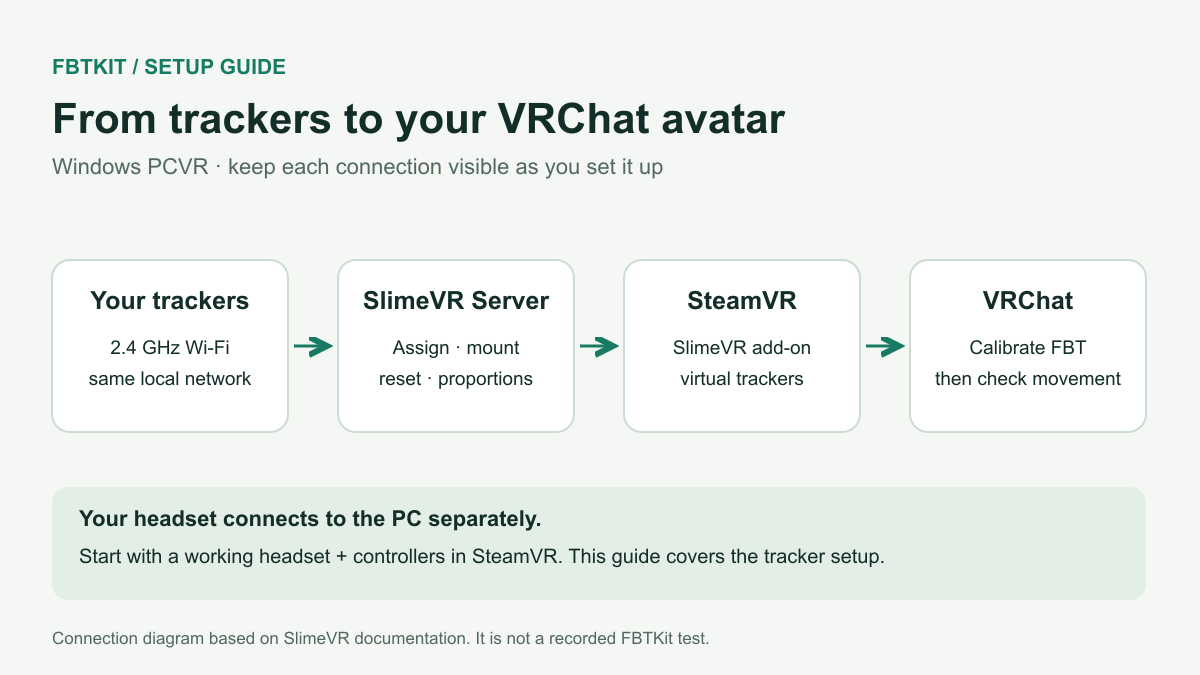
To use SlimeVR trackers in VRChat on a Windows PC, connect the trackers to SlimeVR Server, assign their body locations, set mounting and body proportions, enable the SteamVR output, then use VRChat’s Calibrate FBT. Your headset and controllers should already work in SteamVR before you add the trackers.
This guide follows the Windows PCVR setup. If your Quest runs VRChat directly on the headset, use the Quest PCVR and standalone guide to choose the appropriate connection first. Screenshots below are examples from the official SlimeVR documentation; labels and layout can differ between software versions. Select a screenshot to enlarge it.
Before you start
- A Windows PC with a working headset, controllers, SteamVR and the PC version of VRChat.
- Your SlimeVR-compatible trackers, suitable straps and the manufacturer’s instructions for their controls and mounting orientation.
- A 2.4 GHz Wi-Fi network the trackers can join. Keep the PC and trackers on the same local network/subnet. The PC can use Ethernet or another Wi-Fi band if it can communicate with the trackers.
- A USB cable that supports data for initial connection. A charging cable or multi-device charging lead is not automatically a data cable.
- Space to stand, bend and make a small movement without touching furniture or loose cables.
FBTKit’s current product instructions require SlimeVR Server configuration and 2.4 GHz Wi-Fi. Check the instructions for your exact unit if its connection or button behavior differs from the official SlimeVR hardware shown in a tutorial.
1. Install SlimeVR and connect the trackers
- Install and launch SteamVR at least once. Confirm the headset and controllers are working.
- Open the official SlimeVR Installer release and download the Windows installer from Assets. For this PCVR setup, keep the components required for SteamVR, including the SlimeVR driver.
- Open SlimeVR Server and start its setup wizard. Enter the Wi-Fi name and password for the network the trackers will use.
- Connect one powered-on tracker by USB. Wait for the wizard to identify it and send its network settings. Once configured, unplug USB while leaving the tracker powered on and check that it stays connected over Wi-Fi. Repeat for the other units; compare the connected list with the physical set on your desk.
- When the wizard asks, leave the powered trackers still on a flat surface for sensor calibration. Wait until it finishes before wearing them.

If USB supplies power but the wizard finds no device, try a known data cable before repeating the Wi-Fi password. If the device was configured but is absent wirelessly, use the checks at the end of this guide.
2. Assign body locations and put the trackers on
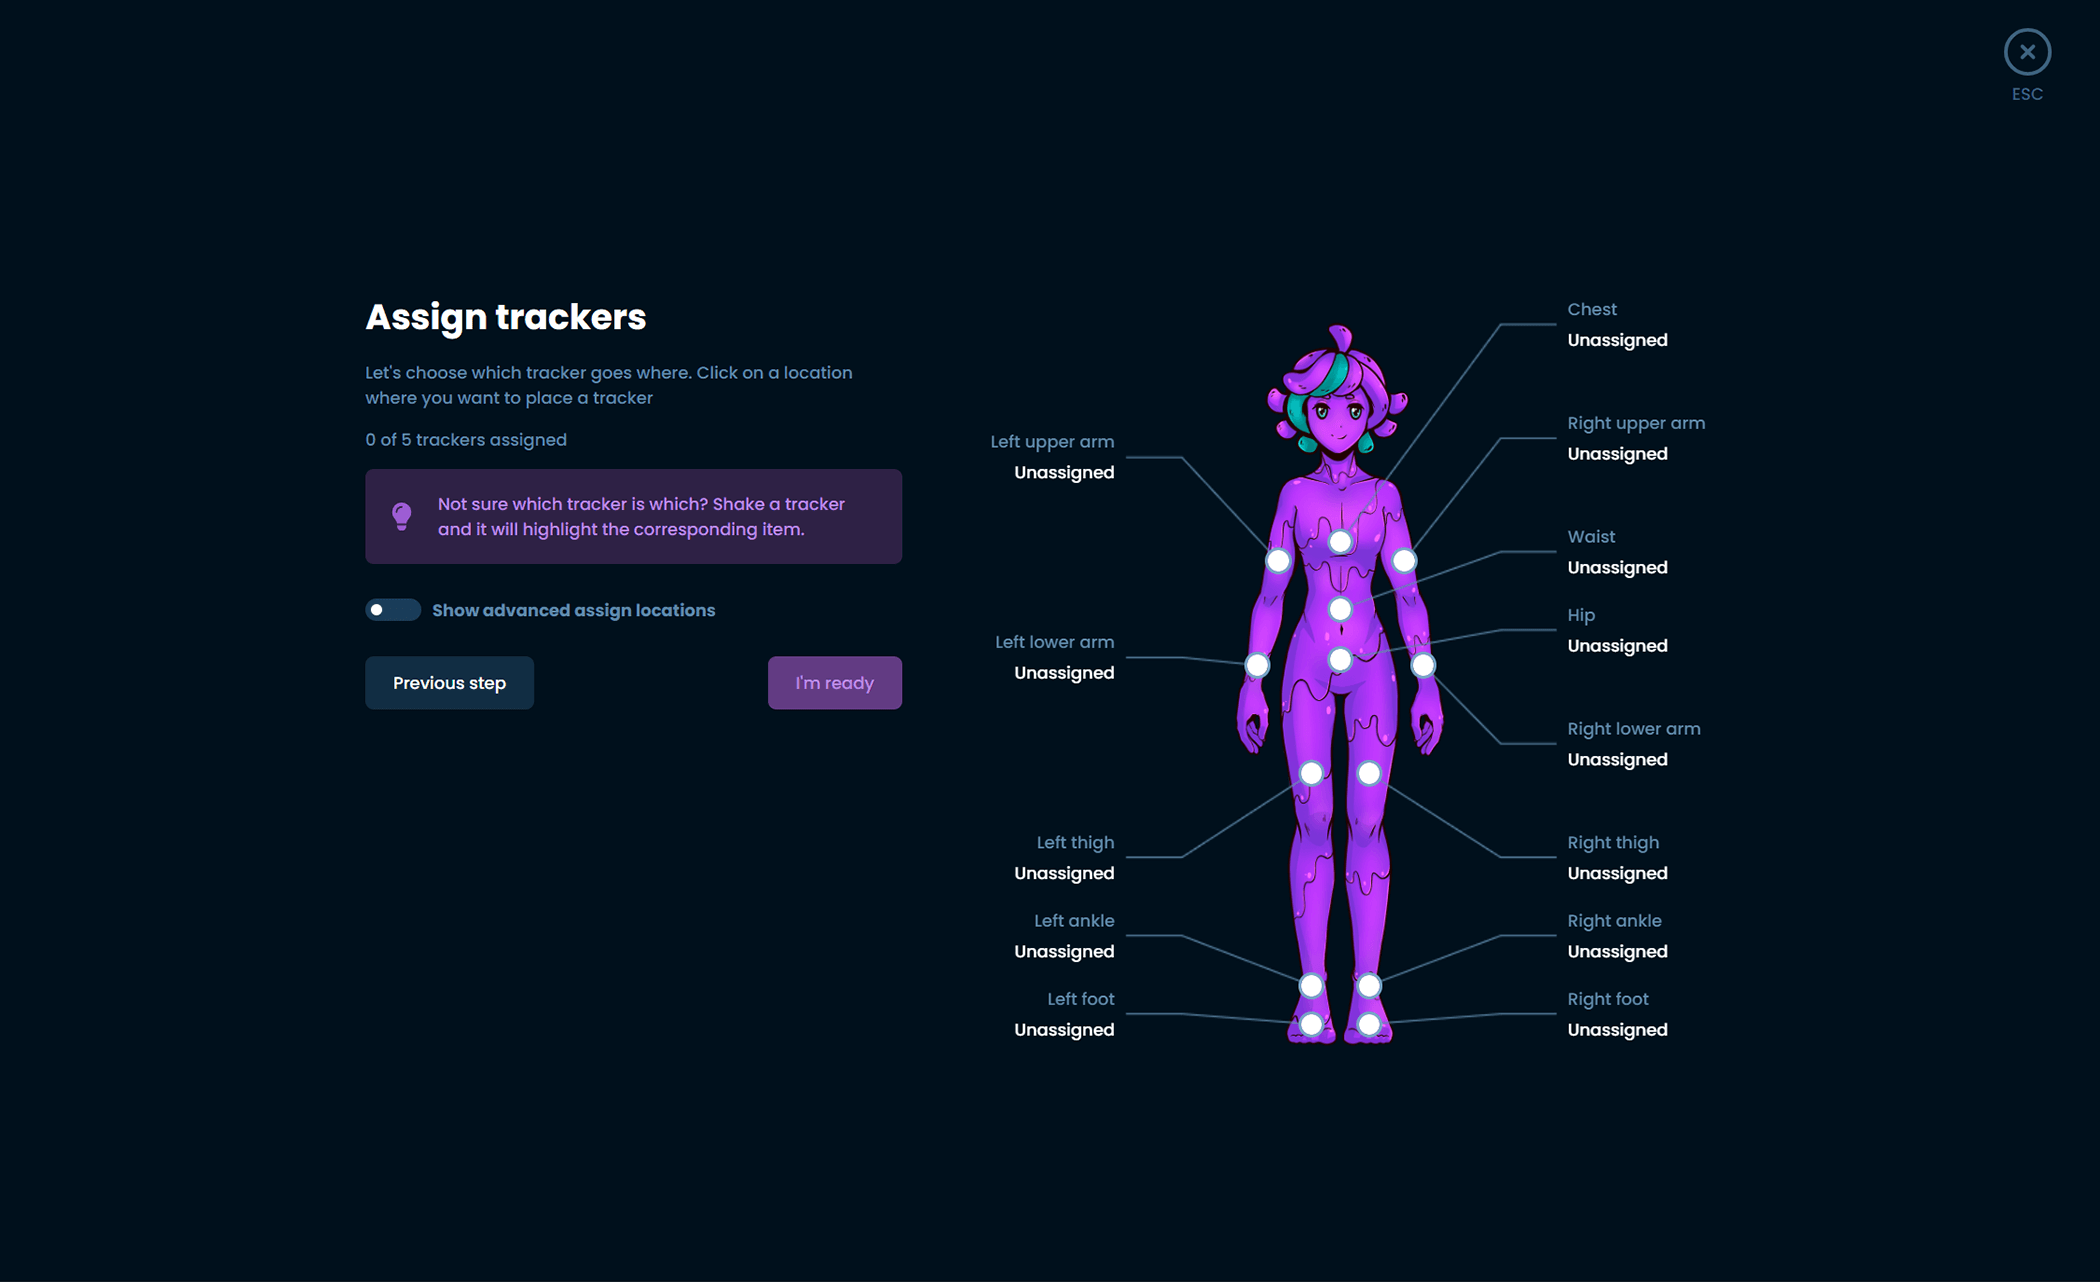
In the assignment screen, select a body location and choose the matching tracker. Move one device at a time to identify its entry, then label it. Match the left and right sides to your own body.
A common six-sensor layout uses Chest, Hip, both thighs and both ankles. SlimeVR’s five-sensor example omits Hip; eight adds both Feet. Use the layout you actually have, including any wired extensions. The illustrated placement guide shows the locations and explains why Waist, Hip, ankle and Foot are separate roles.
Wear the trackers at those locations. Smooth the strap and clothing beneath each case, then make a small turn and bend. Fix any sliding before setting mounting orientation.
3. Set mounting orientation and perform a full reset
For manual mounting, open each tracker’s orientation control and select the direction the device faces when you stand normally. Use the enclosure’s documented axes, especially for a Foot tracker. Do not assume that the front of every tracker is its charging-port side.
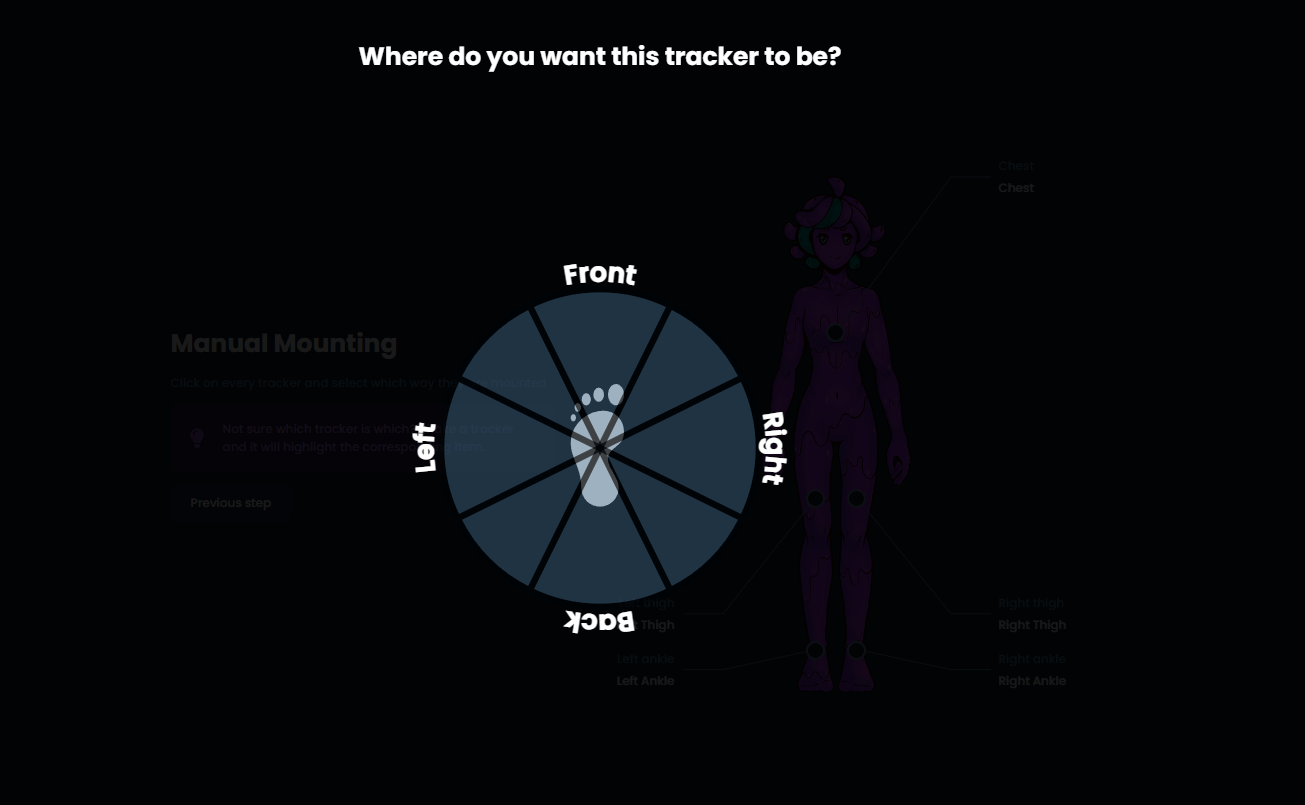
The wizard also offers automatic mounting. If you choose it, have SteamVR running, wear the headset and follow the displayed pose. Use the method supported by your current wizard instead of combining manual directions with a different video’s pose.
For a full reset, stand upright with your legs vertical, face forward and keep the trackers in their configured directions. Trigger Full Reset in SlimeVR and hold still through the countdown. Check that moving a leg moves the corresponding part of the SlimeVR skeleton in the expected direction. Correct a wrong role or mounting direction before measuring body proportions.
4. Calibrate body proportions
Open Body Proportions → Automatic calibration (AutoBone). Wear the headset and trackers, keep SteamVR connected, and check that your headset floor height is set properly. Trackers should be connected and responding correctly before this step.
- Follow the height and preparation prompts.
- Start recording. Perform the movements shown by the wizard while keeping your heels planted in the same places.
- Review the calculated proportions. If the result is obviously wrong, check mounting and floor height, then redo the recording.
- Accept the result when it looks reasonable and return to the Home screen.
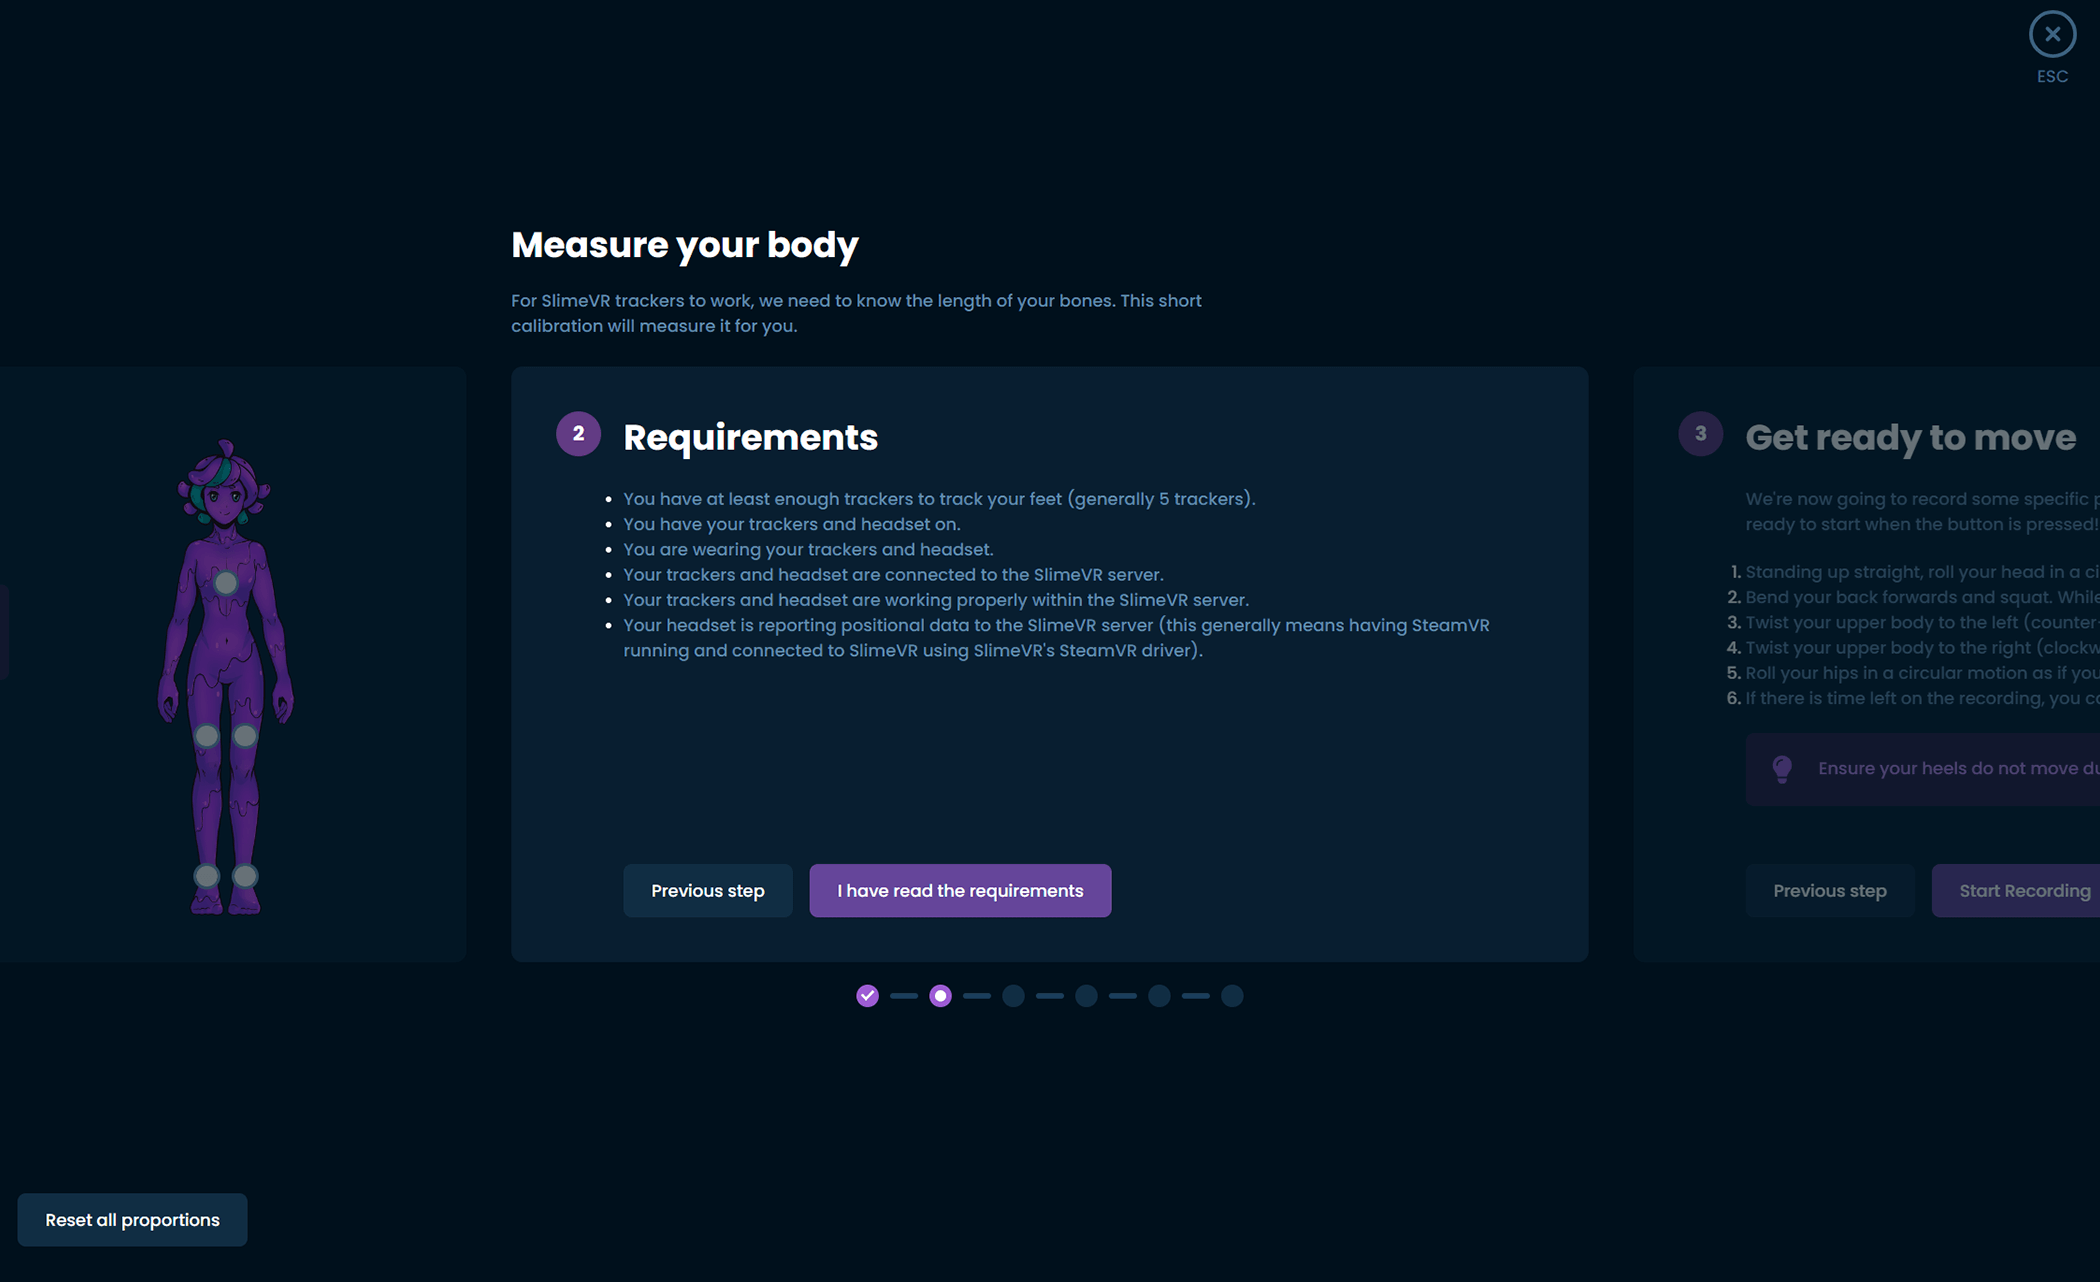
Detailed movement examples and manual measurement instructions are in the official body-proportions guide.
5. Make the virtual trackers available to SteamVR
In SteamVR, check Settings → Startup/Shutdown → Manage Add-ons and enable the SlimeVR add-on if it is disabled. In SlimeVR settings, enable the SteamVR tracker output for your setup. Restart SteamVR if an add-on change requires it.
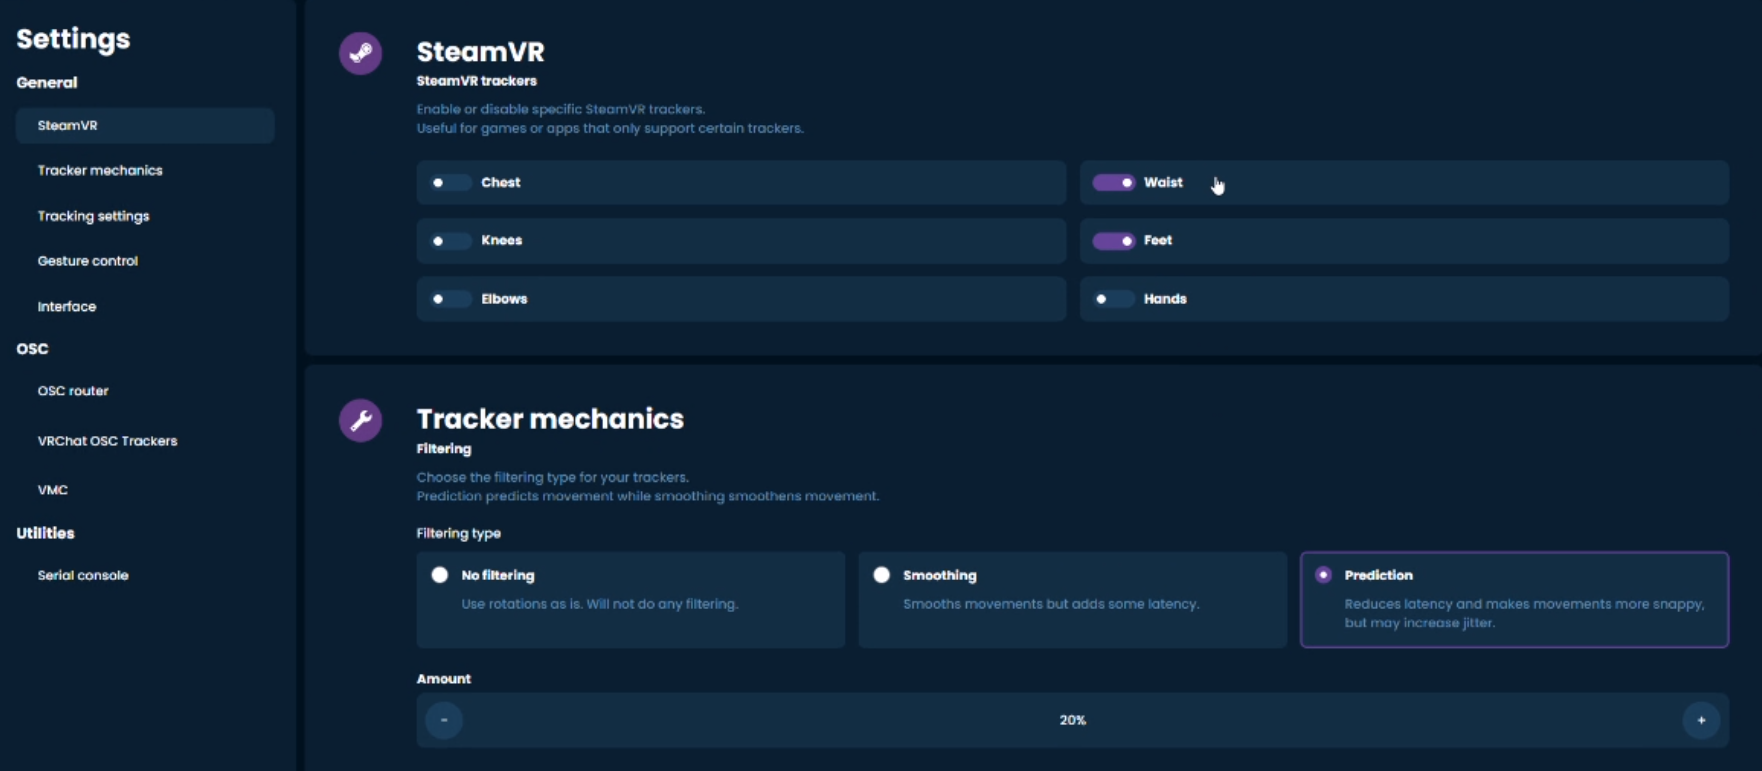
The number of virtual trackers can differ from the number of sensors you wear. Use the current wizard’s configuration for your layout rather than turning on every available point. For this SteamVR route, leave the separate OSC tracker output off.
6. Calibrate in VRChat
Launch PC VRChat with SteamVR and SlimeVR running. Choose the avatar you intend to use, then open the Quick Menu and select Calibrate FBT. Visible tracker spheres indicate that VRChat has received tracking points.
- Check your VRChat height and playspace floor settings.
- Follow the displayed body alignment and check that the hip reference is in a reasonable position.
- Align your arms with the avatar where needed, then stand straight and look directly forward.
- Confirm using both Interact controls together—normally the controller triggers.
If Calibrate FBT is missing, return to the SteamVR output check; changing avatar height will not connect a missing tracker output. See VRChat’s current calibration instructions if the menu differs.
7. Check a few ordinary movements
In a clear space, shift your weight, lift each foot, bend gently and turn. Watch whether the matching side responds and whether a physical tracker slips. If the SlimeVR skeleton looks coherent but one avatar behaves strangely, try another avatar known to work with FBT before changing the hardware setup.
If a step does not work
| What you see | Try this first |
|---|---|
| Powered by USB, but no device in the wizard | Try a data-capable cable and another USB port. Check the device’s USB/driver instructions. |
| Configured tracker missing from SlimeVR | Check power, Wi-Fi credentials, 2.4 GHz availability and the same local network. Ensure only one SlimeVR Server instance is running; check its Windows Firewall allowance using the official troubleshooting guide. |
| Visible in SlimeVR, absent in SteamVR | Check the SlimeVR add-on and virtual tracker output. Restart SteamVR after changing an add-on setting. |
| A limb moves the wrong way | Verify that device’s side, role and mounting direction, then reset from the corrected setup. |
| SlimeVR looks right; one avatar looks wrong | Repeat VRChat calibration with correct height/floor settings and compare a known-good avatar. |
For a persistent connection fault, follow SlimeVR Common Issues or the tracker-not-detected guide. Describe where the tracker disappears: USB connection, SlimeVR, SteamVR or VRChat.
What to do next session
Your saved roles and proportions normally remain available. On the next power-on, let the trackers finish their required flat-surface sensor calibration, put them back on their labeled body locations, complete the mounting/reset steps for how you are wearing them, and calibrate in VRChat. Recheck after a changed mount or avatar; you should not need to reinstall everything.
Documentation checked September 29, 2026: SlimeVR Quick Setup, Body Proportions, Common Issues and VRChat FBT. This guide combines documented steps with FBTKit’s published setup requirements. It is not a recorded FBTKit hardware test.
Screenshot credits and reuse license
Official SlimeVR documentation screenshots. Copyright © 2021 SlimeVR. Reused unchanged under the MIT License; current documentation retrieved September 29, 2026. Original license.
MIT License

Copyright (c) 2021 SlimeVR

Permission is hereby granted, free of charge, to any person obtaining a copy
of this software and associated documentation files (the "Software"), to deal
in the Software without restriction, including without limitation the rights
to use, copy, modify, merge, publish, distribute, sublicense, and/or sell
copies of the Software, and to permit persons to whom the Software is
furnished to do so, subject to the following conditions:

The above copyright notice and this permission notice shall be included in all
copies or substantial portions of the Software.

THE SOFTWARE IS PROVIDED "AS IS", WITHOUT WARRANTY OF ANY KIND, EXPRESS OR
IMPLIED, INCLUDING BUT NOT LIMITED TO THE WARRANTIES OF MERCHANTABILITY,
FITNESS FOR A PARTICULAR PURPOSE AND NONINFRINGEMENT. IN NO EVENT SHALL THE
AUTHORS OR COPYRIGHT HOLDERS BE LIABLE FOR ANY CLAIM, DAMAGES OR OTHER
LIABILITY, WHETHER IN AN ACTION OF CONTRACT, TORT OR OTHERWISE, ARISING FROM,
OUT OF OR IN CONNECTION WITH THE SOFTWARE OR THE USE OR OTHER DEALINGS IN THE
SOFTWARE.
