
Jul
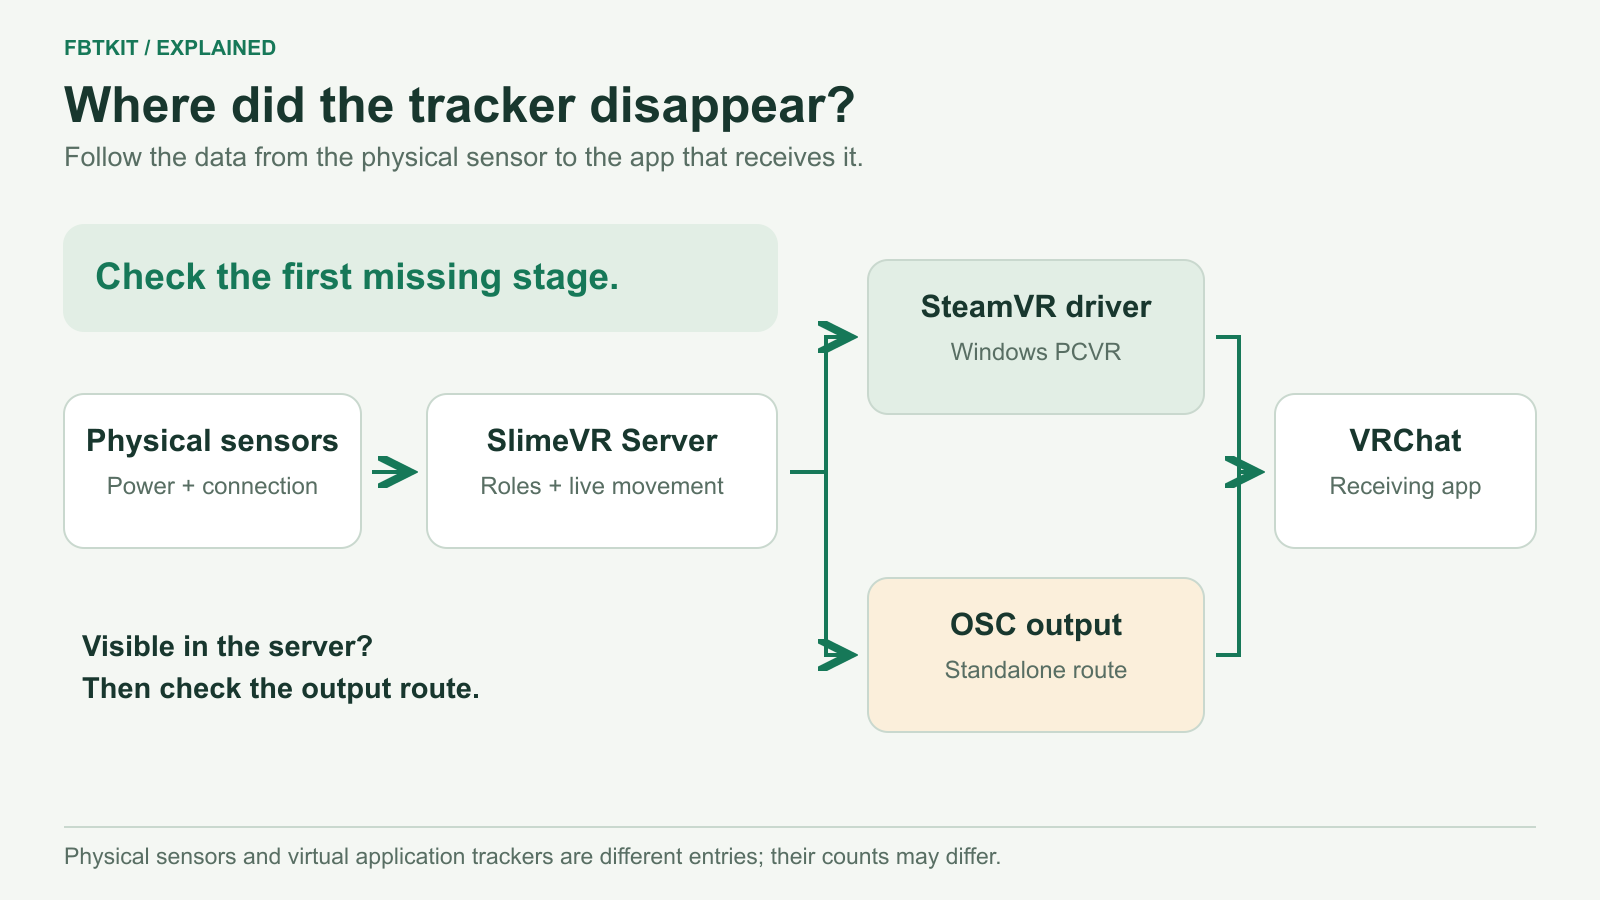
If SlimeVR trackers are not detected, open SlimeVR Server before changing VRChat settings. Find the first place they disappear: the physical sensor list, SteamVR’s virtual trackers, or VRChat. This tells you whether to fix the connection, the output bridge or application calibration.
This guide covers SlimeVR-compatible setups. The Wi-Fi checks apply to Wi-Fi models; trackers using a dedicated receiver need their own pairing instructions.
1. Is the physical sensor responding in SlimeVR?
Open the server’s tracker list and move one device at a time. Find the entry whose rotation changes. Repeat for the missing device and, if your kit has them, its connected extensions. A device listed by name but no longer responding is different from an active sensor.
- One device is absent: check its charge and documented power control, then restart that device. Compare it with one that works without changing the working unit’s setup.
- Every device is absent: confirm the server is running on the intended host. Close duplicate server instances, then check the shared network or receiver connection.
- The entry appears but does not respond: restart the affected device once. If the server continues to report an IMU or sensor error, save that error for the hardware supplier.
Do not infer a specific fault from an LED color unless the instructions for your exact tracker define it. For first-time Wi-Fi provisioning, the SlimeVR connection wizard connects units individually and helps identify them through movement.
2. For Wi-Fi trackers, separate router access from server access
Start by checking the network name and password entered in the setup wizard. Use the Wi-Fi band and security supported by your tracker model; SlimeVR’s current Wi-Fi troubleshooting instructions specify a compatible 2.4 GHz network for the Wi-Fi hardware they cover.
If the router lists the trackers as connected but SlimeVR does not, check whether the tracker network can reach the computer running the server. Guest networks and client isolation can prevent devices from communicating even when both have internet access. A wired computer and Wi-Fi trackers can share a local network; they do not need the same type of network adapter.
On a trusted home network, check the Windows network profile and the SlimeVR firewall rule. SlimeVR provides firewall.bat in its installation folder to add the required Windows rules. Use the copy supplied with the official installation and run it as administrator as documented. Keep the firewall enabled while checking its application rules. The official connection troubleshooting page has the current network-specific steps.
No serial device during USB setup?
Try a known USB data cable, not a charge-only cable, and check that the connector is fully seated. Charging alone does not establish a serial connection. Install only the driver specified for the actual USB chip in your hardware. This is a provisioning check; it does not mean Wi-Fi trackers must stay plugged into the PC during use.
3. SlimeVR works, but SteamVR has no trackers
For the Windows PCVR route, check these in order:
- Confirm the SlimeVR installation includes its SteamVR driver.
- In SteamVR, open Settings → Startup/Shutdown → Manage Add-ons and check that the SlimeVR add-on is enabled.
- In SlimeVR settings, enable the appropriate SteamVR Trackers outputs for your setup, then start or restart SteamVR.
Do not expect one SteamVR icon for every physical sensor. SlimeVR uses multiple sensor measurements to calculate virtual body points. Lower-leg and foot sensors can contribute to one virtual foot tracker. Check the intended output roles rather than comparing two raw counts. See SlimeVR’s virtual-tracker configuration.
If the virtual tracker moves the wrong body part, correct the physical sensor assignment in SlimeVR. Its common-issues guidance specifically advises against changing those SlimeVR-generated assignments in SteamVR.
4. On Quest standalone, check OSC instead
The standalone route does not depend on SteamVR. SlimeVR Server still needs to run on a supported host and receive the sensors. Enable Settings → OSC → VRChat OSC Trackers in SlimeVR, and enable OSC in VRChat’s radial menu.
When the server runs on another device, the destination must be the Quest’s current local IP address. When the server runs directly on the Quest, SlimeVR’s guide specifies 127.0.0.1. Check that the destination still matches after network changes. VRChat’s OSC Debug view can help confirm incoming data. Use the official OSC guide for this route’s alignment steps.
5. Trackers reach VRChat, but the avatar does not follow
Open VRChat’s Quick Menu and use Calibrate FBT. If tracker markers appear, the data has reached the application; placement, pose and avatar calibration are the next checks. Follow the calibration sequence. If the markers are present but one avatar behaves badly, use the avatar troubleshooting guide.
Official documentation checked September 29, 2026. Menu labels can vary by version. These are software diagnosis steps, not a measured FBTKit connection test.
