
Full Body Tracking for Quest 2 and Quest 3: PCVR vs Standalone

Quest 2 and Quest 3 full body tracking routes through PCVR and supported standalone VRChat

Yes. Quest 2 and Quest 3 can use SlimeVR-compatible full body tracking through two documented routes. You can run Quest through a PC and SteamVR, or use supported standalone VRChat through OSC. Choose that route before you choose a tracker count. The headset model alone does not make every Quest app accept external tracker data.

SlimeVR’s official compatibility table lists Quest 2 and Quest 3 for both SteamVR and standalone VRChat. This guide covers SlimeVR-compatible hardware trackers. It does not treat every built-in headset feature or every Quest app as the same tracking system.

If you have not chosen a headset, app, and connection path yet, start with the VR full body tracking compatibility checklist. If you already know that you will use Quest 2 or Quest 3, compare the two routes below.

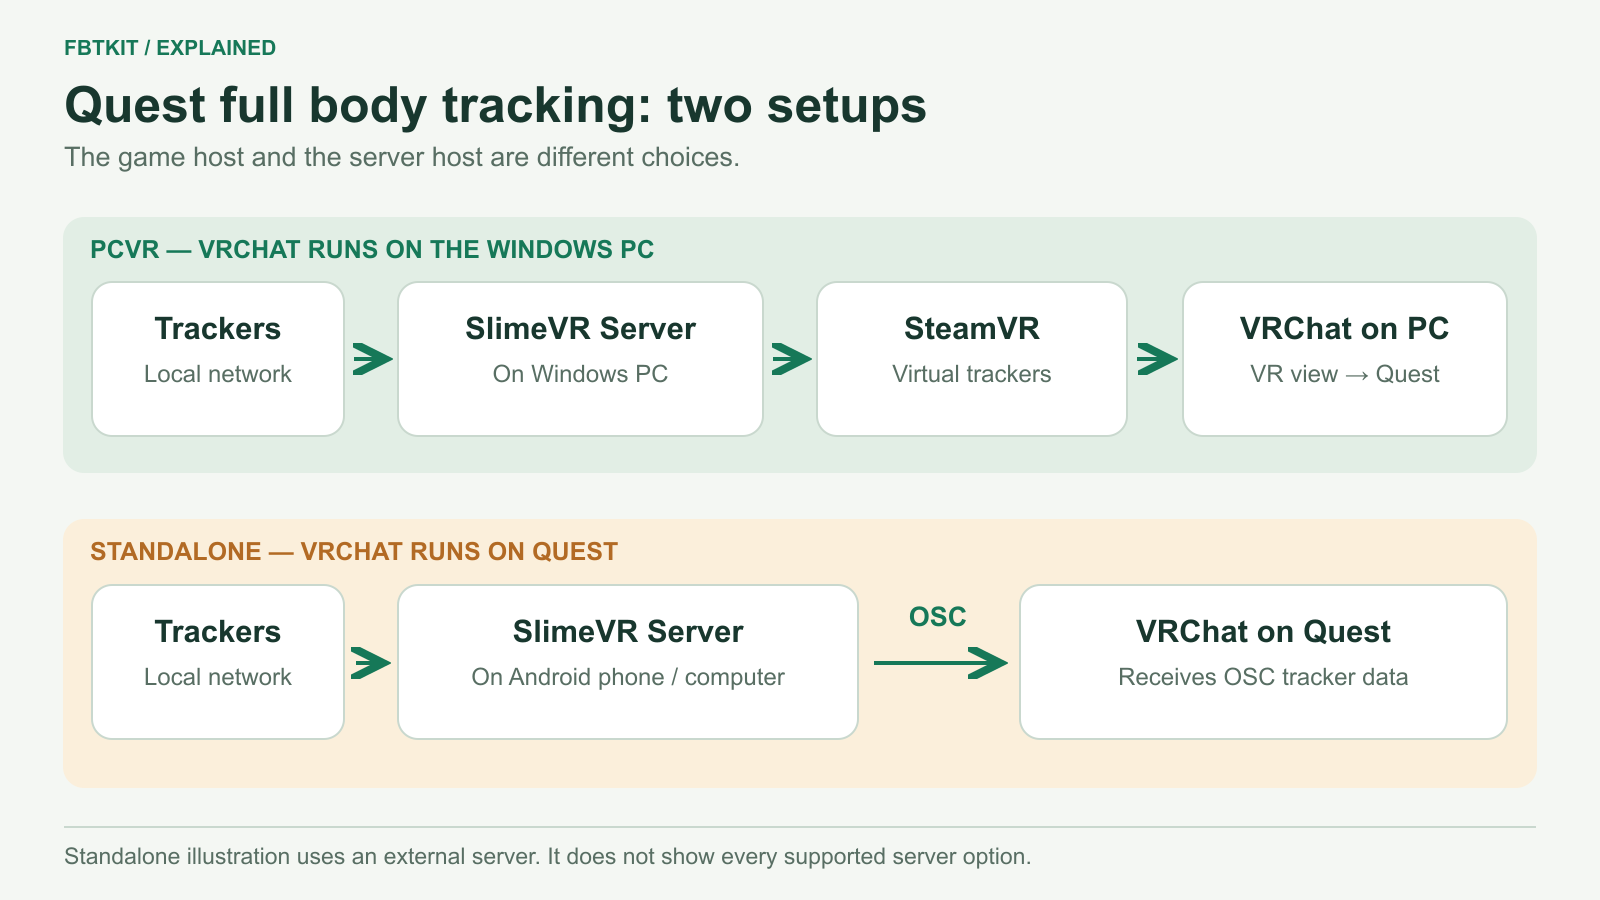
Quest full body tracking has two routes

Decision point PCVR and SteamVR Standalone VRChat and OSC
Where VRChat runs On the PC through SteamVR On the Quest headset
Tracker output SlimeVR exposes virtual SteamVR trackers SlimeVR sends VRChat OSC Tracker data
SlimeVR Server Runs on the PC Can run on Quest or another device on the same network
SteamVR requirement Required for this route Not required for a pure standalone OSC route
Network Hardware trackers use 2.4 GHz Wi-Fi, with the PC on the same network Hardware trackers use 2.4 GHz Wi-Fi, with the SlimeVR Server host and Quest on the same network
Setup work Assign body locations, set mounting, configure proportions, learn resets, and enable SteamVR trackers Assign body locations, set mounting, configure proportions, learn resets, and enable OSC in SlimeVR and VRChat
Choose it when You already use the PC version of VRChat through SteamVR You want to run the supported standalone version of VRChat on Quest

The hardware basics overlap, but each route uses a different output. Follow the SteamVR steps for PCVR and the OSC Tracker steps for standalone VRChat.

Route A: use Quest through PCVR and SteamVR

Choose this route if you already connect Quest 2 or Quest 3 to a PC and run the PC version of VRChat through SteamVR. The Quest-to-PC connection method is part of your PCVR setup. SlimeVR then runs on the PC and presents body points as SteamVR trackers.

The SlimeVR quick setup guide says to install and run SteamVR before completing the SlimeVR install for this route. Keep the SteamVR components selected in the SlimeVR installer, then configure the trackers before opening a social session.

  1. Confirm that your Quest-to-PC route and SteamVR already work without the body trackers.
  2. Install SlimeVR Server with its SteamVR driver and open the server.
  3. Connect the hardware trackers to a 2.4 GHz Wi-Fi network. The PC running SlimeVR Server must be on the same network.
  4. Calibrate the sensors, assign body locations, set each mounting orientation, and configure body proportions.
  5. Enable SteamVR trackers in SlimeVR and confirm that the SlimeVR add-on is enabled in SteamVR.
  6. Open the PC version of VRChat and complete the in-app full body calibration.

Keep the same order each session. The full body tracking setup and calibration workflow separates the initial configuration from the shorter checks you repeat before play.

This route is useful when your VRChat session already depends on the PC. It does not mean every SteamVR app will use the same body points. Check the destination app before buying hardware for an app other than VRChat.

Route B: use standalone VRChat through OSC

Choose this route when you want VRChat to run on the Quest headset instead of through PCVR. SlimeVR documents this as OSC standalone tracking. The supported destination in this route is standalone VRChat, not every Quest application.

According to SlimeVR’s OSC standalone tracking guide, SlimeVR Server can run directly on Quest or on another device such as a phone or computer. If the server runs on another device, set the OSC target to the Quest IP address. The server host, Quest, and tracker network must be able to communicate on the same local network.

  1. Complete the tracker connection, calibration, body-location, mounting, and proportion setup in SlimeVR.
  2. Open Settings, then OSC, then VRChat OSC Trackers in SlimeVR Server and enable OSC.
  3. Use the correct OSC address. Use the local address when the server runs on Quest, or the Quest IP address when the server runs on another device.
  4. Open VRChat on Quest. In the radial menu, open Options, choose OSC, and enable it.
  5. Use OSC Debug if you need to confirm that VRChat sees the trackers.
  6. Open a mirror, choose Calibrate FBT, follow the pose prompt, reset the trackers as instructed, and finish the VRChat calibration.

SlimeVR’s installer also separates this path from the SteamVR path. If the server will be used only for standalone OSC, the quick setup guide says the SteamVR driver and related PCVR components can be deselected. Keep them if you also plan to use PCVR later.

What Quest 2 or Quest 3 changes

Quest 2 and Quest 3 appear in both route columns of SlimeVR’s compatibility table. The headset model does not choose the software route. The version of VRChat does.

  • If VRChat runs on the PC through SteamVR, follow the SteamVR tracker route.
  • If VRChat runs as the supported standalone Quest app, follow the OSC Tracker route.
  • If you want another Quest app, confirm that app’s tracker support separately. Do not extend the VRChat OSC instructions to it without documentation.

Check the network and setup routine

The two routes join again at the hardware setup. SlimeVR-compatible trackers still need a working network, correct body assignments, stable mounting, and calibration. A route can be compatible on paper and still fail during setup if one of those pieces is skipped.

  • 2.4 GHz Wi-Fi: SlimeVR’s hardware tracker guide says the trackers connect to the 2.4 GHz band.
  • Same network: the device running SlimeVR Server must be on the same network as the trackers. The standalone route also needs the correct Quest address for OSC.
  • Sensor calibration: power the trackers on and follow the flat-surface calibration step before wearing them.
  • Body locations: assign each tracker to the body point it will represent.
  • Mounting orientation: tell SlimeVR how each tracker sits on the body. A wrong orientation can make the avatar move incorrectly.
  • Body proportions: configure proportions for the route you use. The official guide gives separate notes for SteamVR and non-SteamVR setup.
  • Reset controls: learn the reset routine before entering a public session.

Use the VRChat setup checklist for the full pre-session routine. It is easier to solve network and mounting issues before friends are waiting in a world.

Choose tracker count after the route

A tracker count cannot repair an incompatible app path. First decide whether the trackers will reach VRChat through SteamVR or OSC. Then list the body points you want the avatar to represent and compare that list with the product’s setup guidance.

  • Which body points are included in the planned layout?
  • How many trackers will you wear, charge, identify, and mount each session?
  • Does the setup guide document the count you plan to buy?
  • Are additional body points useful for your normal movement, or are you buying the larger number without a placement plan?

The current FBTKit listing offers 5, 6, 8, and 10 tracker options. Those numbers describe hardware quantity. They do not guarantee a particular result for every avatar, room, app, or movement style.

Use the tracker count guide to map each option to the body points you expect to use before choosing a larger kit.

Where FBTKit fits

The current FBTKit LSM6DSV SlimeVR-Compatible Full Body Tracking Kit is hardware for the SlimeVR workflow. The listing requires SlimeVR Server and offers 5, 6, 8, and 10 tracker options. The product name does not create a third Quest route. Use the SteamVR or standalone VRChat OSC instructions that match your session.

If you are still deciding between an IMU-based SlimeVR setup and a SteamVR base-station system, read the SlimeVR versus VIVE Tracker comparison. The base-station requirements guide explains the hardware chain behind the second route. That is an ecosystem decision. This article assumes you are evaluating the SlimeVR-compatible path for Quest.

Pre-purchase checklist

  • I know whether I will use PCVR with SteamVR or standalone VRChat with OSC.
  • I know which device will run SlimeVR Server.
  • I have a 2.4 GHz Wi-Fi path for the hardware trackers.
  • I have confirmed that the destination app accepts the chosen tracker output.
  • I have a body-point plan for the tracker count I intend to buy.
  • I am prepared to complete calibration, mounting, proportions, and resets.
  • I have read the current shipping policy and refund policy.

Confirm your Quest route before ordering

If your setup is still unclear, contact FBTKit with your Quest model, PCVR or standalone route, SlimeVR Server device, and planned tracker count. A route-specific question is easier to answer than asking whether a headset is compatible by itself.

FAQ

Can Quest 3 use full body tracking?

Yes. SlimeVR’s compatibility table lists Quest 3 for both SteamVR and standalone VRChat. With SlimeVR-compatible hardware, choose either the PCVR and SteamVR route or the supported standalone VRChat and OSC route. This does not mean every Quest app accepts external tracker data.

Can Quest 2 use SlimeVR trackers?

Yes. SlimeVR lists Quest 2 for SteamVR and standalone VRChat. The trackers still need SlimeVR Server, 2.4 GHz Wi-Fi, body assignments, mounting, calibration, proportions, and the output method that matches the VRChat route.

Does standalone VRChat full body tracking need SteamVR?

No. A pure standalone VRChat route uses OSC Trackers and does not require SteamVR. You still need SlimeVR Server, tracker setup, the correct network address, OSC enabled in SlimeVR, and OSC enabled in VRChat on Quest.

Does Quest 3 full body tracking work in every app?

No. The standalone instructions in this guide apply to supported standalone VRChat through OSC. Other Quest apps need their own documented tracker support. The PCVR route also depends on the PC application accepting the tracker output.

How many trackers do Quest users need?

The headset model does not decide tracker count. Choose a route first, then list the body points you want to represent and confirm the intended placements. FBTKit currently offers 5, 6, 8, and 10 tracker options, but a larger count does not guarantee a better result for every use case.

What is the difference between PCVR and standalone Quest tracking?

In the PCVR route, VRChat runs on the PC and SlimeVR provides virtual SteamVR trackers. In the standalone route, VRChat runs on Quest and SlimeVR sends VRChat OSC Tracker data. Both routes still require tracker network setup, body assignments, mounting, calibration, proportions, and resets.

Leave a Reply